其他
Redis
windows下安装
下载、解压
下载 Redis 3.2.100(这是解压免安装版的最高版本)。 解压压缩包到指定目录,因此,后文的 REDIS_HOME 指的就是指定目录启动
在 REDIS_HOME 目录下打开cmd,执行如下命令:

redis-server.exe redis.windows.conf

# 简写。有些版本的 Windows 系统无法简写,原因不明。
redis-server.exe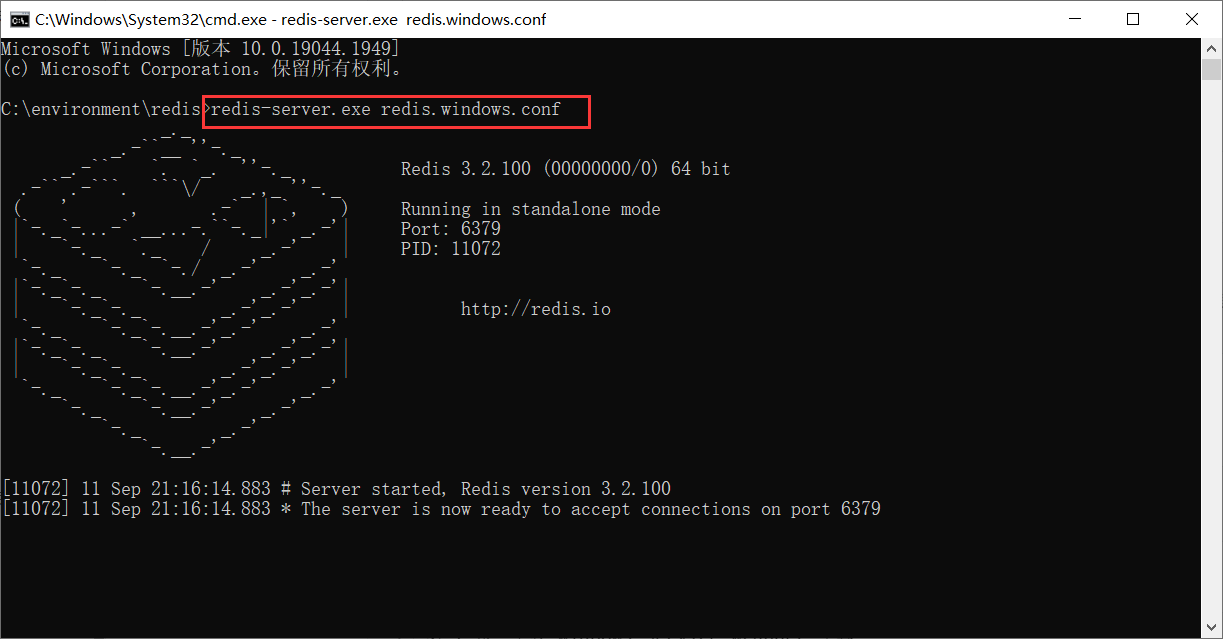
当出现此界面的时候,说明启动成功,Redis 正监听端口 6379,等待客户端发起连接。 通过上述命令启动 redis-server 之后,执行启动命令的那个命令行窗口就一直是被占用着的。只要它一直是占用状态,Redis Server 就一直在运行。连接到Redis Server
进入 redis 的解压目录,打开一个命令行终端,执行如下命令: redis-cli.exe借助 WinSW 启停 Redis
第 1 步:下载 Windows Service Wrapper 工具

https://github.com/winsw/winsw/releases/download/v2.11.0/WinSW.NET461.exe

WinSW github( .NET 4.6.1 版 )

将下载好的 WinSW 放到 REDIS_HOME 目录下,并重命名。名字任意,例如:systemctl.exe 。

第 2 步:为 WinSW 创建配置文件

在 REDIS_HOME 下为 WinSW 创建配置文件( 配置文件与 WinSW 程序平级 )。配置文件为 .xml 文件,且名字必须与 WinSW 程序相同。例如:systemctl.xml ,与上面的 systemctl.exe 相呼应。

systemctl.xml 配置文件内容如下:

<service>
  <id>redis-server</id>
  <name>Redis Server</name>
  <description>Redis Server</description>

  <executable>%BASE%\redis-server.exe</executable>
  <startargument>redis.windows.conf</startargument>

  <stopexecutable>%BASE%\redis-cli.exe</stopexecutable>
  <stopargument>shutdown</stopargument>

  <logpath>%BASE%\logs</logpath>
  <logmode>roll</logmode>
</service>
在上述的配置文件中,我们「告知」了 WinSW 以什么命令启停 Redis Server 。未来,我们不再亲自启停 Redis Server ,而是通过 WinSW 间接启停 Redis Server 。

第 3 步:安装 Redis Server 服务

在 REDIS_HOME 目录下打开 cmd 命令行执行如下命令:

# 安装服务。开机启动,当前未启动,重启后生效。
systemctl install

# 如果对「开机启动」有异议,可通过 Windows 的 sc 命令调整
sc config redis-server start= demand           # 手动启动
# sc config <服务名称> start= auto      # 开机启动,当前未启动,重启后生效
# sc config <服务名称> start= disabled  # 禁用
安装成功后,你可以在 Windows 系统的服务中看到 Redis Server 。

WinSW-redis-in-服务.gif

install 的反向操作是 uninstall ,uninstall 之后在 Windows 服务中就看不到它了。

# uninstall 的前提是服务已停止
systemctl uninstall
注意,install 和 uninstall 的操作只用执行一次,在日常使用中并非反复执行( 也无必要 )。

第 4 步:启动 Redis Server 服务

提示

你在 Windows 的 服务 点点点,也能实现下述命令的功能。就看你偏好哪种方式了。

# 查看状态
systemctl status

# 启动服务
systemctl start
其它:停止 Redis Server 服务

# 查看状态
systemctl status

# 停止服务
systemctl stop
远程连接redis
参考 《如何使用Redis进行远程连接(怎样连接redis)》
打开redis.windows.conf、redis.windows-service.conf
	1.找到 bind 127.0.0.1
		修改为:# bind 127.0.0.1
	2.找到 protected-mode yes
		修改为:protected-mode no
然后重启redis服务RDM
TIP
一款好用的redis可视化工具
git
官网下载安装包
直接安装,一直下一步就行配置:
全局忽略文件
第 1 步:在你的用户的家目录( C:\Users\<用户名> )下创建一个名为 Global.gitignore 的文本文件( 本质上,这个文件叫什么名字无所谓,只要保证这里叫什么名字未来配置中用什么名字就行 )。

注:windows的家目录可以在地址栏输 %homepath% 回车进入

第 2 步:将下面Global.gitignore内容添加到 Global.gitignore 文件中

第 3 步:在 .gitconfig 中添加如下内容:
    [core]
    	excludesfile=~/Global.gitignore
点我查看Global.gitignore内容
HELP.md

### STS ###
.apt_generated
.classpath
.factorypath
.project
.settings
.springBeans
.sts4-cache

### IntelliJ IDEA ###
.idea
*.iws
*.iml
*.ipr

### NetBeans ###
/nbproject/private/
/nbbuild/
/dist/
/nbdist/
/.nb-gradle/
build/

### VS Code ###
.vscode/

### Java ###
*.class
*.log
*.ctxt
.mtj.tmp/
*.jar
*.war
*.nar
*.ear
*.zip
*.tar.gz
*.rar
hs_err_pid*
replay_pid*

### Maven ###
target/
pom.xml.tag
pom.xml.releaseBackup
pom.xml.versionsBackup
pom.xml.next
release.properties

### Node ###
logs
*.log
npm-debug.log*
yarn-debug.log*
yarn-error.log*
lerna-debug.log*
.pnpm-debug.log*
report.[0-9]*.[0-9]*.[0-9]*.[0-9]*.json
pids
*.pid
*.seed
*.pid.lock
lib-cov
coverage
*.lcov
.nyc_output
.grunt
bower_components
.lock-wscript
build/Release
node_modules/
jspm_packages/
web_modules/
*.tsbuildinfo
.npm
.eslintcache
.stylelintcache
.rpt2_cache/
.rts2_cache_cjs/
.rts2_cache_es/
.rts2_cache_umd/
.node_repl_history
*.tgz
.yarn-integrity
.env
.env.development.local
.env.test.local
.env.production.local
.env.local
.cache
.parcel-cache
.next
out
.nuxt
dist
.cache/
.vuepress/dist
.temp
.cache
.serverless/
.fusebox/
.dynamodb/
.tern-port
.vscode-test
.yarn/cache
.yarn/unplugged
.yarn/build-state.yml
.yarn/install-state.gz
.pnp.*Gitkraken
先取消自动更新,在安装
安装前提条件:
安装了 git
注册了一个 github 账号
取消自动更新配置:
打开 cmd ,输入:
notepad.exe C:\Windows\System32\drivers\etc\hosts 回车

在hosts文件最后加上:
0.0.0.0 release.gitkraken.com

保存,退出消息队列
安装包: RabbitMQ
erlang
windows下安装:
txt
由于 RabbitMQ 是用 Erlang 语言编写的,因此需要先安装 Erlang 语言的开发、运行环境。

安装:
	在官网下载Windows版本的安装包: erlang-otp_win64_22.0.exe
	一直下一步就行

添加环境变量:
	ERLANG_HOME=C:\Program Files\erl-24.3.4 (等号右边为安装路径,如果没有改就是:C:\Program Files\erl-24.3.4)
修改环境变量 Path ,在原来的值的基础上追加%ERLANG_HOME%\binRabbitMQ
GitHub上下载RabbitMQ的压缩包 将压缩包解压到无中文的目录下
1.安装 web 控制台插件
	在解压目录下的 sbin 目录下打开控制台,输入并执行如下命令:
		rabbitmq-plugins.bat enable rabbitmq_management

2.运行 rabbitmq server
	在解压目录下的 sbin 目录下打开控制台,输入并执行如下命令:
		rabbitmq-server.bat

3.访问 web 管理页面
	通过浏览器访问 http://localhost:15672,并使用默认用户 guest 进行登录,密码也是 guest.

4.关闭
	ctrl-c 或者直接关闭运行 rabbitmq 的控制台。